You have the problem of your central AC not working. It’s not turning on and just doesn’t turn on at all. You have the AC set to cool but nothing runs, not even the fan. Here’s a comprehensive list of what you can pretty easily check yourself. (see here if the compressor outside runs but the condenser fan outside doesn’t, see here for a full list of problems & causes including AC turns on but doesn’t cool)
Other pages we found on this topic all gave just a few tips. Our list includes additional items for the DIYer who would prefer to try everything possible before calling a pro and spending hundreds or thousands. You only need a few basic tools. If you have a multimeter you can do more extensive testing. If you don’t have a multimeter we suggest getting this one. (note: This article deals specifically with central AC not turning, not running on at all)
At a glance, here’s all the causes for your AC not working

* Electric Panel – Tripped breaker or blown fuse
* Thermostat not switched on
* Components not all plugged in or switched on
* Disconnect not pushed in or has blown fuse
* Clogged air filter
* Thermostat has wiring issue or has failed
* Drain line is clogged or float switch is bad
* Bad capacitor
* Blown transformer
* Burned fuse on circuit board
* Circuit board failure
* Bad relay
* Other electrical issues
* System Low on Refrigerant Due to a Leak
Electric Panel – Tripped Breaker or Blown Fuse
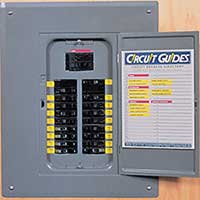 The first possible cause of your AC not working could be at the breaker panel. Check the main electric panel to see if any breakers have tripped. Reset any breaker that has tripped by pushing it to off, then back on. Some older panels have fuses instead of breakers. Check for any blown fuses. Replace any blown fuse. If this powers your AC back you could be good to go. It may have been just a fluke instance. However, if it shuts down again there is likely a short in the system. Also, keep in mind that often systems will take 5 minutes to reset before powering back on. So now make sure your thermostat is set to cool and see if the system comes back on.
Thermostat Not Turned On= AC Not Working
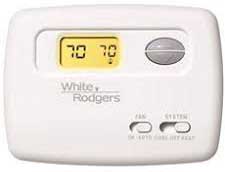 This is the most obvious reason for your AC not turning on. It’s the first thing that a professional will check. Seems like a no brainer, but double check it. Make sure your thermostat is set on cool and at least five degrees lower than the room temperature. Some thermostats have a start up delay, so give it up to five minutes to kick on. If nothing happens, onto the next item…
All Components Are Not Powered On
 Next possible cause of the AC not working is something is not connected. Make sure all the components are connected to power. The furnace, air handler and outside unit – the condenser, must all be connected, plugged in or switched on. For example an electric furnace may have a large plug connected to an outlet. Additionally it may also have a power switch. Some even have a small green LED power indicator light. So make sure everything is plugged in and switched on. A simple check for all the connections may reveal the reason for your ac not turning on. The furnace may also have a small fuse inside on the circuit board. Likely you’ll have to open a panel to check this.
Disconnect Not Pushed In Or Has Blown Fuse
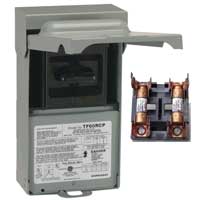 The outside unit – the condenser, typically has a disconnect box right near it. If you open the box there’s a part called a disconnect that inserts and can be pulled out. Make sure this disconnect is seated all the way in. The disconnect shuts off power to the condenser when it’s removed. Some disconnects also have large fuses on them which can be seen when the disconnect is removed. Pull out the disconnect to check for fuses. (Always be very careful as there is typically 240 volts passing through the box.) On some disconnect boxes there are fuses behind a panel on the box. You have to remove the panel to check. Not all disconnect boxes have fuses. If you do find a burned fuse you may have discovered a simple reason for your AC not working. Replace the fuse and see what happens, hopefully the problem is solved. If the fuse blows again there’s obviously another problem.
Clogged Air Filter
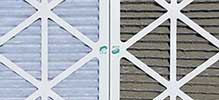 A very dirty filter can be the cause of your central AC not working. A clogged filter blocks airflow over the evaporator. The evaporator ices up and trips a low pressure switch shutting down the system.
Thermostat Has Wiring Issue Or Has Failed
Turn off power to the system at the thermostat. Pull the cover off the thermostat to check if all the wires look firmly connected. Make sure the cover isn’t pichning any wires. Also, if the thermostat uses batteries, check the batteries and replace if needed. Put back the cover and switch on the AC. Give it at least 5 minutes as some thermostats units have a 5 minute reset time as a safety feature.
Next you can check to see if the thermostat is faulty. There’s a simple wiring test which will bypass the thermostat. It requires no special tools. If your system runs when the thermostat is bypassed, then it’s the cause for the AC not turning on.
Drain Line is Clogged or Float Switch Is Bad
HVAC systems remove moisture from the air and this condensation has to be drained from the system. Sometimes the drain line becomes clogged with sludge. If the drain line is clogged a ‘float switch’ will shut down the system preventing water from overflowing onto the floor or ceiling (float switch – aka ‘drain switch’ or ‘overflow switch’).
Check the pan under the inside unit to see if it’s filled with water. Some units have a pvc fixture sticking out the side of the unit with the float switch inside. You can open it to see if it’s filled with water. You may just need to unclog the line – a pretty simple fix for your AC not working (a wet vac really helps for this). In some cases the problem is the float switch is bad and needs to be replaced.
How To Check a Float Switch:
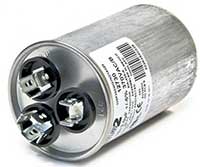
Bad Capacitor & Multimeter Testing
 We’ll next discuss a few things you can check with a multimeter. If you don’t already have one you can get a decent meter for about $20. It’s pretty easy for any do it yourselfer to learn a few basic functions of a multimeter for situations like this. A multimeter is essential for any do it yourselfer to narrow down the reason for the AC not turnng on.
With a multimeter check the capacitor. The capacitor is a part that is on the condenser – the outside unit. A failed capacitor is a pretty common reason for the AC not working. A new capacitor is not too expensive or difficult to replace yourself. Often a capacitor is only about $20. It can be ordered online from homedepot or an HVAC parts website. In some states you cannot purchase such parts from a brick and morter AC parts store without a professional license.
To check the capacitor be careful to disable the power. You can shut off the breaker to the system but at least be sure you remove the disconnect from the disconnect box next to the condenser. Then you can remove the panel on the condenser and look for the capacitor – a cylinder shaped part with 2 or 3 wires on it. Some folks take their chances and replace the part without first testing it with a multimeter since it’s usually only $20 or so. You may get lucky and find the problem was simply a bad capacitor. If you do order a replacement make sure the number matches for MFD, microfarads. For example 40+5uf (microfarads) – the 40 is for the compressor and lower number 5 is for the fan.
 If you want to test the capacitor with a multimeter it should be disconnected and removed. Removing the capacitor is just a matter of disconnecting a few screws and wires. Before disconnecting anything make sure to take note of which wires are connected to which connectors on the capacitor. It’s a good idea to take a picture first before disconnecting anything. You could mark the wires with labels. The capacitor has 3 connectors marked ‘COM’ for common (main power), FAN for the fan & HERM for hermetic compressor.
The capacitor supplies power to the fan and compressor as needed. It stores a high amount of voltage – 240 volts and more. Thus before testing a capacitor with a multimeter it is strongly advised to first discharge the voltage from the capacitor. That applies to any capacitor you are testing whether new or used. To be safe and avoid shock it’s always wise to make sure it’s discharged first. The following videos show how to easily discharge and test the capacitor.
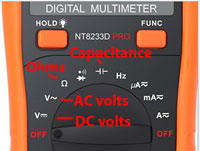
There’s two tests than can be done with a multimeter. Some multimeters however do not have a capacitance setting, so you can only test it with the Ω Ohms setting. The Ohms test will tell if the capacitor is at least not completely shot. It can be done with any basic $8 multimeter. The capacitance reading will give a better idea of how efficiently the unit is functioning. It measures the microfarads and the readings should match what’s listed on the capacitor. For example 40+5 – you should get around 40 when measuring COM with HERM (hermetic compressor) and around 5 when measuring COM with FAN. Many multimeters do not have a capacitance setting. Here is a multimeter with capacitance we recommend.
Whichever meter you use, make sure with a multimeter that you have the meter set properly for all your readings. Make sure your wires are plugged into the right sockets on the multimeter. If you are unfamiliar with a multimeter we start here with an introductory tutorial. A basic understanding gives you a much better chance to fix the cause of your AC not working.
How To Safely Discharge a Capacitor
How To Test Capacitor – Ohms Test Only
Test Capacitor With Both Capacitance & Ohms
Blown Transformer, Circuit Board or Other Electrical Issue
You can determine if an electrical part has failed by testing power measurements with a multimeter. It helps to first have a basic concept of how the electrical system works on an hvac unit. Generally, the system power runs something like this on central AC:
1. power comes from outside to the main electrical panel passing through breakers or fuses.
2. From there the 240 volts of power runs to the furnace/air handler. There the power goes through a transformer and circuit board. Sometimes it goes first to the transformer, then to the circuit board. Or it can go first to the board, then to the transformer and back to the board. The transformer steps the power down to 24 volts going back to the circuit board.
3. The circuit board outputs 24 volts through a set of contact screws which are wired to the thermostat.
4. The thermostat connects or disconnects power back to the circuit board according to the set temperature. Power from the thermostat goes back to the circuit board and onto the furnace, fan and outside AC unit.
5. The circuit board is equipped with a fuse to protect it from power overload. You need to inspect the fuse in place visually or with the multimeter to see if it’s burned. If you need to remove the fuse to check it visually, it’s a good idea to disconnect the power by unplugging the large plug from the power outlet on the wall or wherever it’s mounted. You’ll need to remove the panel on the unit to check the fuse and check the power going in.
Checking the Voltage With a Multimeter
With the multimeter check along the line of current to see if the components are receiving the power they need. In this way it’s possible to narrow down which part is the culprit. For our test we suggest having multimeter wires with clips for ease of use, though needle probes will do. You only need to know how to use the voltage function for the following test.
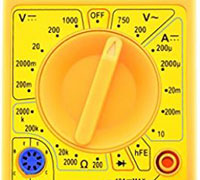
After checking the fuse now check the main power to the unit. Have the unit plugged in. Set your multimeter to AC volts. Make sure you have it set to AC, not DC or you won’t get a reading. If you’re not getting a voltage reading it can be because there’s no power, or it can be because your meter isn’t set correctly. You don’t want to make a wrong conclusion because you didn’t set your meter correctly.
 Also, you have to have the meter on the correct setting for AC. Some meters will have 2 AC settings, for example a 200 setting and a 750 (AC for alternating current, not air conditioning). The 200 is to check voltage between 0 and 200, so use that setting when checking for 24 volts. The 750 setting is for checking voltage between 200 and 750 (see below image). Use this setting to check for 240 volts. Note that for these tests it doesn’t matter whether you touch either side with the red or black tips, you’ll get the same numbers either way, but one way will show a negative the other positive.
 Follow where the main power line connects from the outlet into the unit. Check the 2 connectors inside the unit for 240 volts. Voltage reading should be at or near to 240. If power is not reaching the unit then you have some electrical issue. We mentioned before about the circuit breakers or fuses at the main electrical panel which you should have already checked and reset. It’s possible that a circuit breaker has gone bad and needs to be replaced. Or there’s some other electrical problem. In any case, if power is not reaching the furnace/air handler then you most likely need to call in an electrician.
If you have 240 volts at the furnace/air handler, then you need to next check if power is coming out of the circuit board. See the set of screws on the board with several thin wires connected. These wires run to the thermostat. The screws are labeled. Look for ‘R’ with a red wire. Red is the main power. Test your contacts on R & C. You can test any of the other contacts together with R as well. You should be getting 24 volts. But if you already tested the wiring on your thermostat as shown in the above video, and nothing turned on, then it’s likely that you won’t be getting 24 volts here. In this case, 240 volts of power is going into the furnace/air handler, but no power is coming out from the board. This means that either the board or the transformer are the reason for the AC not working.
Checking & Replacing the Transformer
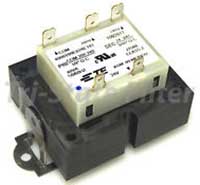 Let’s next check if power is going into and coming out from the transformer. The transformer is a box right near the board. It has 4 wires connected to it. 2 wires are for 240 volts going in and 2 wires are for 24 volts going out back to the board. The transformer is labeled with COM and 240 volts on one side (a third connector is for 208 volts if required instead of 240v). On the other side it’s labeled COM and 24 volts, for the 24 volts power going to the board.
The transformer serves to step down the voltage from 240 volts to 24 volts for safe operation of the circuit board and thermostat. To safely test the transformer pull the power plug to disconnect power from the furnace/air handler. Then attach your meter clips to the side of the transformer with COM & 24 volts to see if 24 volts power is coming out from the transformer. Plug the power back in & turn your meter on to the right AC voltage setting to check the voltage. If you’re getting near 24 volts then your transformer is ok. If not, then test the the other side of the transormer for 240 volts going in.
 If you find that voltage is going into the transformer but nothing is coming out then a bad transformer may be the cause of the ac not working. It’s possible that the transformer failed by itself without any outside cause, but there’s also a possibility that an electrical issue has caused the transformer to fail. Transformers generally last a long time and more often it’s an electrical issue that causes them to fail. Circuit boards are more likely to fail on their own. If after testing both you conclude that only the transformer is bad then you can replace the transformer with inline fuse holders on the 2 wires sending power into the unit. Use the same amp fuse as the one on the circuit board. This will protect the new transformer from shorting out in case there is an electrical issue. You will need a new transformer either way. If a fuse blows it will protect your new transformer and you’ll know that some other electrical issue is the main reason for the AC not working.
To replace the transformer disconnect the power again and check the transformer for numbers on the label. Order the new part from the numbers on the transformer. The new part must have matching input, output & VA, for example: 240v/ 24v / 40VA. When replacing the new transformer make sure power is disconnected and the thermostat is set to off. Carefully take note of where the wires are connected. Reconnect the wires to the new transformer exactly the same way. Once installed, close the panel, reconnect power and turn your thermostat to cool to test the system. Wait up to 5 minutes for the system to start.
Circuit Board Failure – Testing & Replacing Circuit Board
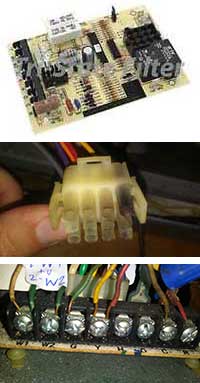 If 24 volts is coming out from the transformer you most likely have a bad circuit board. 24 volts is going into the circuit board but nothing is coming out. If you pull the main plug with several wires going into the board you may discover a burned socket in the plug, another indication that the board blew out. It is possible that the board itself blew out simply due to age and wear.
If your 240 volts and 24 volts look good passing in & out of your transformer then most likely a blown board is the cause of the AC not working. In this case simply replacing the board should fix the system. In some cases there could be some other electrical short which is the main problem.
Disconnect the power and get the part number off the circuit board to order a replacement. Ebay is a great place to check for the parts. Make sure when you replace the part, the power plug is disconnected and thermostat is set to off. You will have to very carefully take note of how the wires are connected. Taking pictures and labeling the wires as you disconnect them is very helpful. There are many wires connecting to the board and if even one is not reconnected properly the system will not work. So take your time to carefully remove the board and replace the new board. Look carefully to check how the connectors on the board are labeled and compare with your new circuit board. Look for labels next to the connectors like ‘240’, ‘COM’ AND ‘FAN’. Sometimes side by side connectors can be placed in a different order on the new board. For the most part the new board should be identical, but new boards can have slight differences. So check everything carefully to make sure every wire is properly connected.
Once your parts are installed, close back your panel, plug the power back and then you can set the thermostat to cool to see if you have succeeded. Remember some thermostats have a built in delay where the system can take up to 5 minutes to turn on. Hopefully you’ll now know for sure why was your AC not working.
Replacing a circuit board yourself could save you an estimated $500-$1000. Here’s some additional instructions on replacing a circuit board.
Bad Relays
Some HVAC electrical systems are equipped with relays which can short out and are replaceable. This is one other thing you can test with a multimeter. Here’s how to test relays:
Other Electrical Issues
There could also be a wiring issue. All the wires should be properly insulated. Make a visual inspection of the inside & outside unit to see if there are any exposed wires or corroded contacts. Sometimes it’s just a matter of replacing part of a wire. Make sure power is disconnected should you need to replace any wiring. Beyond these issues, it’s possible some other wiring or short circuit is the reason for the AC not working. This is better left for a professional.
System Low on Refrigerant Due to a Leak
Another cause for the AC not working is low pressure. HVAC systems are closed pressurized systems. If the system is low on refrigerant due to a leak this will also cause the low pressure switch to shut down the system. A professional is recommended for this one. Our do it yourself info here is going into more depth than most articles, however testing system pressure requires special tools and know how beyond the scope of this article. And if after all your system is low on pressure you will still need a professional.
We hoped this has helped you to resolve your AC not working with little difficulty or expense.